Tip: When cutting out the wool for the pod flowers,
- Trace the entire shape onto freezer paper, iron to the Tango (orange) wool and cut out.
- Remove the freezer paper and cut away the scalloped edge.
- Iron the remaining freezer template (without the scalloped edge) to the Turquoise wool, cut out close to the template and remove the template.
- Cut away the template on the remaining drawn line. Iron the small piece to the Plum wool, cut out and remove the template.
When you pin the pieces in place just stack the Turquoise on top of the Tango and the Plum on top of the Turquoise. By using this method, there is no matching of pieces and you have more depth to the flowers.
For the second Pod Flower, use the same templates, just iron them close together on the Tango and Turquoise wool.
For the second Pod Flower, use the same templates, just iron them close together on the Tango and Turquoise wool.
Embellishment Fun:
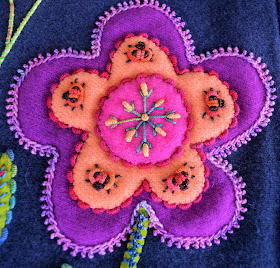
Large Flower:
This flower is outlined with Crested Chain Stitch. If you have never used this stitch before, I recommend a little bit of practice. You may find it easier to start with a #8 Pearl Cotton to learn the 4 steps for each stitch. Once you are comfortable with the sequence of the stitch, practice with some extra Silken Pearl #5. The secret to having your stitches look like those in the photo is beginning with a very small chain stitch. While there are a few steps to this stitch, the end result is worth it.
Flower Center: Begin the center by stitching 4 Fly Stitches with long anchor stitches. Imagine the center flower is a clock and place your stitches at 12, 3, 6 and 9 o'clock.
Now, add 4 more fly stitches between the first ones with shorter anchor stitches.
Add a Bullion Knot in the "V" of each Fly Stitch and a French Knot in the center.
Inner Petals: Add a Lady Bug as explained in the pattern to each petal. I thread 2 Bullion Knot needles, 1 with each color of thread and just move the needle/thread out of the way as I stitch the next color.
Both the Inner Petals and the Center are outlined with Bullion Knots.
Flower Stem:
Embellish the stem with Palestrina Stitch with the horizontal stitch stretching from one side of the stem to the other. Don't be tempted to pull the thread tight when making the knot. Pull slowly to obtain the round shape. Pulling too tight on the thread loses the detail.
Pod Flowers:
I really like the single Oyster Stitch on the Tango scallops. Sometimes a simple embellishment is all you need. My tip for making the Oyster Stitch is don't pull the thread too tight. Take it slowly to get the nice rounded shape.
I've found that running the Sea Grass through a thread conditioner like Thread Heaven or a similar product, helps to take the kinks out and keep the thread flat as you stitch as on the Fly Stitch used on the Turquoise. Confession: when it was announced that Thread Heaven was discontinued I purchased every bit I could find. I'm still using this stash and can't recommend another brand.
Just 3 Cast-On stitches is all you need to embellish the Plum wool.
Couched Stems:
Draw a line with a chalk pencil for the stem to the top Pod Flower and the swirl on the flower stem. Double thread a #5 Pearl Cotton into a #22 or #18 Chenille needle and pull up from behind at one end of the drawn line. Lay these threads side-by-side as you couch them in place with a #8 Pearl Cotton.
Single Oyster Stitches with #5 Silken Pearl complete the swirls.
Leaves:
After stitching the center of the leaves with Fly Stitch and outlining with Bullion Knots, I decided they needed a little bit of color. I threaded a #22 Chenille needle with #5 Silken Pearl and coming up from the back at the base of the Fly Stitches, whip each Fly up the center and then take the needle to the back and tie off.
Have fun and find some shade to stitch Block 7.


No comments:
Post a Comment