Pages

Monday, October 9, 2017

Solstice Dream Block 12 - Autumn Leaves


Outside my window leaves are changing to their autumn colors making it very timely to continue our stitch along with this block.

The stitch along instructions and tips for Solstice Dream blocks include the needles and types of threads used in this project.  Thread colors are included in the pattern.  Book pages refer to those in the Right (or Left) Handed Embroiderer's Companion available in my Etsy shop.
 
Green Leaf:
Thread a #1 Milliner needle with size 3 pearl cotton and outline both the inner and outer leaf with Back Stitch (page 10).

Using Sea Grass in a #1 Milliner needle, Fly Stitch (page 91) around the inner leaf (see photo).


Lady Bug
The lady bug is a series of Bullion Knots (page 18).  Thread two #1 Milliner Needles - one with an orange shade of Silken Pearl #5 and the other with a brown or black shade of Dazzle.

  1. Begin with the orange color in the center of the body, making 2 parallel bullion knots (5 wraps for each stitch). Don't cut the thread - just move it out of your way on the wrong side of the fabric.
  2. Add a Bullion Knot with 3 wraps using the dark color close to the center Bullions.  Since these stitches are shorter that the center Bullion Knots, place them equidistant from the top and bottom of the orange Bullions. Knot off the dark thread on the back of fabric and cut your thread.
  3. Add an orange Bullion Knot with 10 wraps to curve around the dark bullion knots by bringing your needle up at the top of the dark bullion and taking it down at the bottom of the dark bullion.  The extra wraps will cause the stitch to curve.
  4. Use the dark thread to add 2 horizontal bullion knots for the head.  The knot closest to the body will have 5 wraps and the next one has 3 wraps.
  5. Add 2 straight stitches at top of head for antennae and 6 straight stitches on either side of body for legs.
Circle:
Cover the wool circle with Chain Stitch (page 43) using a #24 Chenille needle threaded with size 8 Pearl Cotton.  Begin at the outside of the circle and work towards the center.

Center Leaf:
Thread a #24 Chenille needle with size 8 Pearl Cotton, Fly Stitch (page 91) the length of the inner leaf, with the "arms" of the Fly extending to the sides of the inner leaf.

With the same needle and thread, add Detached Chain Stitch (page 46) at the end of each arm on the outside leaf fabric (see photo).

With the #24 Chenille needle, change to a contrasting size 8 Pearl Cotton to whip the center and arms of the Fly Stitch.

Inside each Detached Chain Stitch, add a Bullion Knot using size 8 Pearl Cotton in a #1 Milliner needle.

Outline the outer leaf with Back Stitch (page 10) using size 3 Pearl Cotton in a #1 Milliner needle.

Leaf with 3 circles:
Randomly place Tete le Boeuf (page 91) stitches on the inner leaf using Silken Pearl #5 in a #24 Chenille needle.

Fly Stitch (page 91) around the inner leaf using Sea Grass in a #1 Milliner needle. 

Outline both the inner and outer leaf in Back Stitch (page 10) using size 3 Pearl Cotton in a #1 Milliner needle.

Make flowers on each of the 3 circles with 6 Double Cast-on Stitch (page 40) using a #1 Milliner needle and size 8 Pearl Cotton.  Outline the circles with the same thread in #24 Chenille needle and Pekinese Stitch (page 13).


Stems:
Cover all stems in Thorn Stitch (page 151) using Silken Pearl #5 in a #24 Chenille needle. 


Thursday, September 14, 2017

Solstice Dream Block 11 - Sneaky Spider


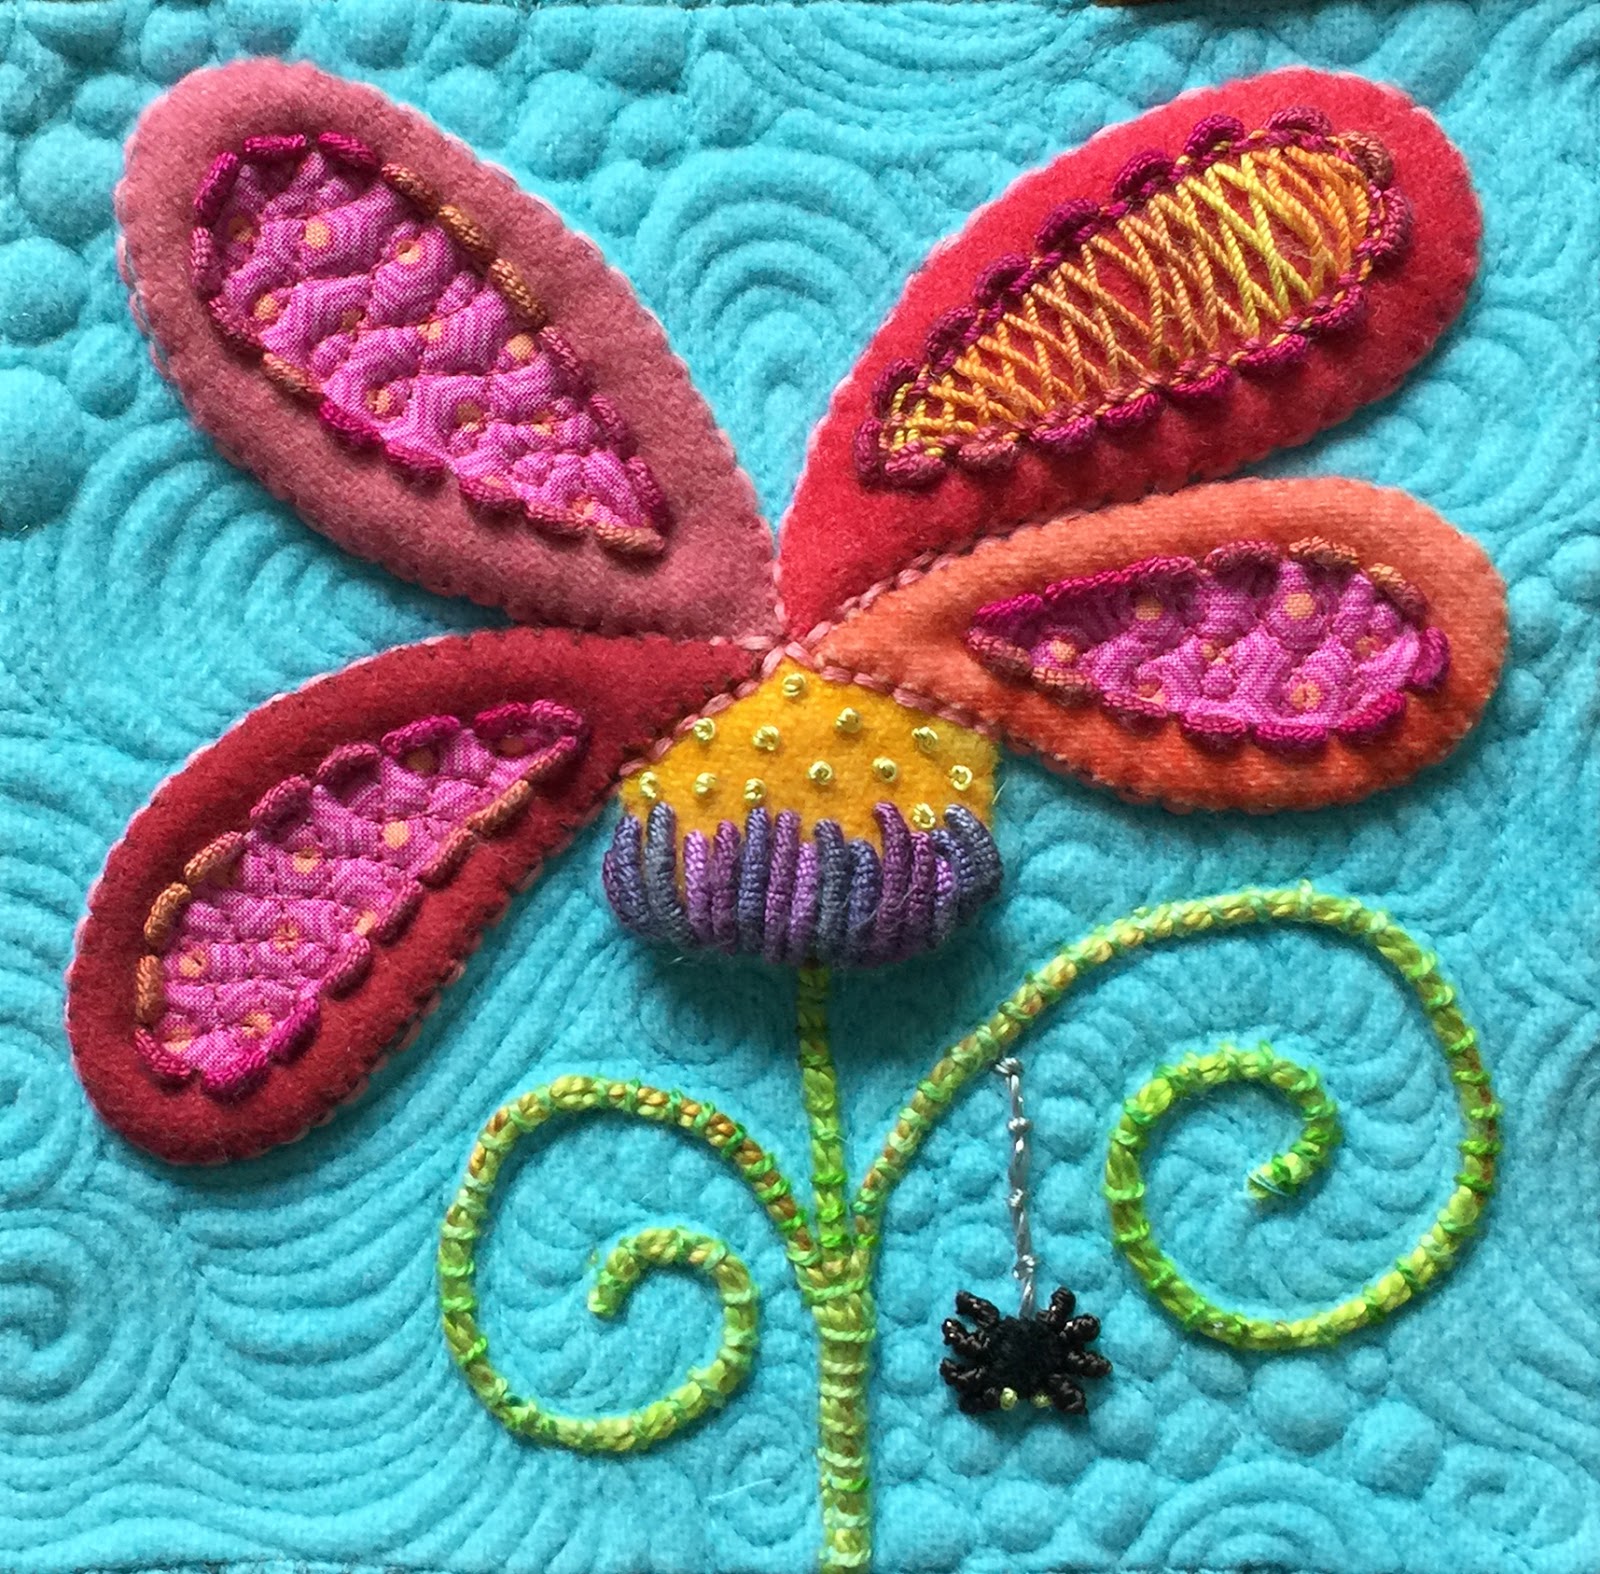
I've heard it before..... you don't like spiders.  I kind of like them, especially on stitching and this sneaky spider makes me smile.  Maybe it's my fascination with the amazing webs they weave.  If you don't like them, just add some bees instead.

Before we get started, don't you just love the quilting on this project?  Cindy Paulson at Quilted Connection is a true artist, bringing each one of my quilts to life.  As you get close to finishing Solstice Dream, I encourage you to think about the quilting and contact Cindy to be added to her calendar.  

Flower Petals:
Three of the petals have an inner petal of cotton that has been appliqued in place, with another petal that is really a show-stopper.  Let's begin with the "different" petal.

Iron the freezer paper template for inner petal #3 in place marking the center of the outside rounded edge.  Using a #24 Chenille needle and Silken Pearl #5, Back Stitch (page 10) around the freezer paper template from the point to the center mark.  Before proceeding, count how many stitches you made.  Proceed with Back Stitches to the point taking the same number of stitches.  This is important to keep the weaving in the next step even.

Remove the freezer paper template and thread a #1 Milliner needle with the same Silken Pearl #5 and weave Double Pekinese (page 14)  through the back stitches.

Tip:  Use the "eye" end of the needle for the weaving to avoid catching the underlying fabric or piercing the back stitch threads.

Outline all 4 inner petals with Bullion Knots (page 18) using a #1 Milliner needle and Silken Pearl #5.

Outline the outer petals with Back Stitch (page 10) using a #1 Milliner and Sea Grass. 

Yellow Flower Center:
Use a #1 Milliner needle and Silken Pearl #5 to make Bullion Knots (page 18) of varying lengths across the bottom of the flower center.

Randomly stitch French Knots (page 94) with 2 wraps, using a #24 Chenille Needle and Dazzle thread along the top. 

Stem and Curvy Branches:
By now you know I just "eyeballed" the curvy branches, but if you feel more comfortable with a line, just draw them on with some type of marking pencil.

Thread a large-eyed needle similar to a #18 Chenille with Pearl Cotton #3, bringing the ends together to make a double thread.  Pull the needle up from the back side and hold the threads along your drawn line (or eyeballed line) as you Couch (page 66) in place with Pearl Cotton #8 in a #24 Chenille needle.  To finish, take all the threads to the back and secure with a knot.

Sneaky Spider:
I appliqued a 1/4" wool circle in place for the spider's body, and then covered it with Satin Stitch (page 132) using a #24 Chenille needle and Dazzle thread.  The wool circle gave me a guide for my Satin Stitches and more texture than stitching directly onto the background block.  The legs (remember, there are 8), are small Bullion Knots (page 18) with the same Dazzle thread in a #1 Milliner needle.  I used 5 wraps on the Bullion Knots.  I added 2 eyes using a yellow Dazzle in a #24 Chenille needle to make French Knots (page 94) with just 1 wrap.

This Sneaky Spider is hanging by a Dazzle thread that is Couched in place.  Both the long stitch and couching stitches are the same Dazzle thread.


Block 10 - Big Bloom


The stitch along instructions and tips for Solstice Dream blocks include the needles and types of threads used in this project.  Thread colors are included in the pattern.  Book pages refer to those in the Right (or Left) Handed Embroiderer's Companion available in my Etsy shop.


This block is going to be so easy for you!  Let's get started with a new stitch, Pekinese.  We used the Double Pekinese for the flower petals on Block 3 and this is a more simple variation.

Flower - light purple:
The Pekinese Stitch (page 13) is a 2-step stitch beginning with a Back Stitch (page 10).  Thread a #24 Chenille needle with Dazzle thread to Back Stitch an outline along the top of the flower.

Tip: Don't make the back stitches too small.  Making them just a bit larger will make the next step easier. 

 Thread a #1 Milliner needle with Silken Pearl #5 and weave through the back stitches to complete the Pekinese Stitch.

Finish off the light purple with French Knots (page 94) scattered along the top.  Use a #24 needle threaded with Dazzle and just 2 wraps.

Flower - bright pink:
Thread a #1 Milliner needle with Silken Pearl #5 and outline the bright pink center with a row of Bullion Knots (page 18)

Flower center - dark purple:
Begin near the top edge of the dark purple center and work Cast-On Stitch (page 39) with a #1 Milliner needle and Silken Pearl #5.  About 1/4" below this row continue with another row.  Continue stitching 2 more rows of the Cast-on stitches about 1/4" apart.

Large Petals:
Inner Petal
Thread a #24 Chenille needle with Silken Pearl #5 and outline the inner petal with Crested Chain Stitch (page 58).  

 Tip:  There are multiple steps to the Crested Chain stitch.  Practice on a wool scrap with the Silken Pearl #5 to learn the size of the chain and the small stitch for the knot.  I made small stitches and yes, it took some practicing to get it just right. 

Outer Petal
With a #1 Milliner needle and Silken Pearl #5, outline the petal with Palestrina Stitch (page 117).

Leaves:
Create the vein in the center of the leaf with Fly Stitch (page 91 ) using Pearl Cotton size #5 in a #24 Chenille needle.  Using the same needle and thread, outline the leaves with Back Stitch (page 10).

The bees are stitched as explained in previous blocks.


Saturday, September 2, 2017

Block 6 - Thorn Birds & Bees, part 2


The stitch along instructions and tips for Solstice Dream blocks include the needles and types of threads used in this project.  Thread colors are included in the pattern.  Book pages refer to those in the Right (or Left) Handed Embroiderer's Companion available in my Etsy shop.

This block is the focal point of Solstice Dream containing so many elements of a garden right down to the fuzzy bees.  Let's not wait any longer to finish this block.

Bee Skep:

 It's easy to see in the above photo that I didn't mark the stitching lines on the skep.  If you want your lines perfectly straight start by drawing a line 1/2" from the bottom of the skep, and 4 more lines 1/2" apart.  A chalk pencil works well for this.

Thread a #1 Milliner with size 3 Pearl Cotton and stitch the 5 rows in Palestrina Stitch (page 117).  Using the same needle and thread, outline the bee skep with Back Stitch (page 10).

Fuzzy Bees
Whenever someone sees my Solstice Dream for the first time, they love the fuzzy bees and reach out to touch them.  These 4 bees are a real eye-catcher on this project.  Have you been worried about stitching the bees?  Don't be concerned, they are easier than you may think.
This bee looks quite naked withought his "fuzz", doesn't she?  With a #24 Chenille needle and Dazzle thread cover the head with Satin Stitch (page 132) and add 2 straight stitches for the antenna.

With a #24 Chenille needle and  Sheep's Silk thread, cover the bee body with Turkey Work (page 155) which is just a loop and straight stitch. You can also watch this helpful video.

Cover the bee body with loops.
 
 Cut the loops.
 
 Fuzz it up.
 
 Trim the fuzz to give a rounded shape.
 
Tip:  I used the point of my needle to fuzz up the threads by running it through the cut threads.  A bunka brush is made specifically for this but I find the needle or a small eyebrow brush works just as well.
 
Bunka Brush

Thread a #24 Chenille needle with Dazzle and add 2 Lazy Daisy (page 47) stitches to each side of the body for wings.

Ovals
Using a #24 Chenille needle and silken pearl #5, Fly Stitch (page 91) around the inner oval.  Inside each Fly Stitch, add a Lazy Daisy using the #24 Chenille needle and size 8 Pearl Cotton.

There you go! You have just completed the largest block on Solstice Dream.

Solstice Dream Stitch Along Class
 Join me for a fun day at My Girlfriend's Quilt Shoppe in Midway, UT on September 29, 2017.  I will be teaching stitches used to embellish Solstice Dream.  Bring your appliqued blocks and questions.  For price, time, and to register contact:

Jennifer or Teresa
My Girlfriend's Quilt Shoppe
435-654-2844

Tuesday, August 8, 2017

Block 6 - Thorn Birds & Bees, part 1

When I began stitching Solstice Dream this is the block I started with.  If you are doing the blocks in order, the only new stitches are the Feathered Chain and Turkey Work.  Let's get started!

The stitch along instructions and tips for Solstice Dream blocks include the needles and types of threads used in this project.  Thread colors are included in the pattern.  Book pages refer to those in the Right (or Left) Handed Embroiderer's Companion available in my Etsy shop.

Branches:
Applique the ric-rac in place with a matching cotton thread.  Using Pearl Cotton #8 in a #24 Chenille needle, make a small Pistil Stitch (page 94) on each peak of the ric-rac.


Leaves:   
With Pearl Cotton #5 in a #24 Chenille needle stitch a Feathered Chain (watch my video here) down each large leaf beginning at the point and continuing to the rounded bottom.  

Don't pull the chains too tight.  We want them rounded so we can add a Bullion Knot (page 18) using Silken Pearl #5 in a #1 Milliner needle into the center of each chain.
For the small leaves use Pearl Cotton #5 in a #24 Chenille needle to Feather Stitch down the center of the leaf.  Add French Knots (page 94) inside each feather stitch with Silken Pearl #5 in a #24 Chenille needle.

Outline all leaves using Pearl Cotton #5 in a #1 Milliner needle with Bullion Knots (page 18).  


Purple Leaves:
Couch (page 66) a length of Pearl Cotton #3 for the stems using either a #1 Milliner or #18 Chenille needle.  Outline each leaf with Back Stitch (page 10) using Silken Pearl #5 in a #24 Chenille needle.  With the same thread and needle add a Pistil Stitch (page 94) in the center of each leaf and add 2 small Pistil Stitches to each side of it plus a French Knot (page 94) at the tip of the leaf.
Center Flower:
Begin by using Silken Pearl #5 in a #24 Chenille needle to Back Stitch (page 10) around the small petals.  Using the same thread and needle, outline the large petals with Crested Chain Stitch (page 58).  The Needle 'n Thread video is easier to follow on the  Crested Chain Stitch

Tip:  There are multiple steps to this stitch.  Practice on a wool scrap with the Silken Pearl #5 to learn the size of the chain and the small stitch for the knot.  I made small stitches and yes, it took some practicing to get it just right.  The crested chain is stitched on the flower, not the background.

Highlight the large petals with a line of Sea Grass using a #1 Milliner needle.  If you don't feel comfortable "eyeballing" this line as you stitch, draw a line to follow.  

Tip:  Run a length of Sea Grass through Thread Heaven a few times or iron it to keep it flat as you stitch. I also like to make the Sea Grass back stitch just a little bit longer.

Using the same Silken Pearl #5 in a #24 Chenille needle, Fly Stitch (page 91) on each flower sepal and down the entire length of the stem.

Birds:

I used a fun thread to embellish the birds called Shimmer Floss in a #24 Chenille needle.  Fly Stitch (page 91) two rows along the body and then Back Stitch (page 10) two lines on the tail.

Outline the bird with Back Stitch (page 10) using Silken Pearl #5 in a #24 chenille needle.

Add a bead for the eye or here's an easy way to stitch a similar looking eye:
  1.  Thread a #1 Milliner needle with Dazzle thread and make a Bullion Loop (page 20) with 25 wraps. 
  2. Add a few couching stitches with the same thread to hold the loop in place.
  3. Inside the loop add a French Knot (page 94) with a darker color of Dazzle.
Optional:
I've been stitching a second Solstice Dream for my good friend, Julie.  She loves to applique but isn't too crazy for embellishment.  I missed stitching on my Solstice Dream so much I asked her if I could do the embroidery for her to which she immediately said "yes".
 
When I finished this block for Julie I added Satin Stitch (page 132) to the beaks using Silken Pearl #5 in a #24 chenille needle.

I'm going to take a quick break while you catch up.  I promise to get back soon to finish up with the fun fuzzy bees.

Popular Posts